DIY Paver Patio: Step-by-Step Backyard Build for Beginners
You want a gorgeous backyard hangout without hiring a crew that charges more than your car? Build a paver patio. It looks custom, lasts forever, and you can knock it out over a weekend or two with a solid plan and some hustle. I’ll walk you through it step by step so you avoid the usual “well that’s not level” chaos and end up with a patio you’ll humblebrag about for years.
Plan Smart: Size, Location, and Slope
You win the patio game in the planning phase. Pick a spot with easy access, good sun, and a clear path for drainage. You want the patio to slope away from your house so it doesn’t become a splash pad during storms.
Aim for a slope of 1/8–1/4 inch per foot away from structures. That keeps water moving without feeling like you’re on a ramp. If you can, avoid placing the patio under huge trees—roots and falling debris complicate everything.
Permits, Utilities, and HOA
Before you dig, make one important call: call 811 to locate utilities. You don’t want to meet your gas line with a shovel. Check your local rules and HOA guidelines too—some areas require permits for patios or fire pits.
Patio Size and Layout Tips
Think about furniture, walking paths, and how you move through the space. For a table and chairs, plan at least 10×12 feet. For a lounge set, 12×16 feet or larger feels roomy.
Mark it with string and stakes, then set out your furniture to test the layout. You’ll catch spacing issues now instead of after you lay 500 pounds of stone.
Drainage and Slope Basics
Pick the high point near the house and set string lines to a consistent drop. For example, over 12 feet, a 1/4-inch-per-foot slope equals a 3-inch total drop. Keep your slope consistent in one main direction to avoid weird puddles.
If your yard holds water, consider a French drain at the patio edge or run-off path. FYI, the base handles drainage best when you use angular crushed stone, not round gravel.
Tools and Materials Checklist
You don’t need a contractor’s trailer, but you do need the right gear. Here’s the practical list that makes the job smooth.
- Pavers: concrete or stone, typically 2 3/8″ thick for patios
- Crushed stone base (also called 3/4″ minus or crusher run)
- Concrete sand for bedding (not play sand)
- Polymeric sand for joints
- Geotextile fabric (non-woven) to separate soil and base
- Edging restraints with 10″–12″ spikes
- Plate compactor (rent one)
- Shovels, wheelbarrow, rake, and a sturdy tamper
- 2 pieces of 1″ metal pipe or straight conduit for screed rails
- 6–8 ft level and string line
- Rubber mallet
- Measuring tape, stakes, and marking paint
- Angle grinder with diamond blade or a wet saw for cuts
- Broom and leaf blower
- Safety glasses, hearing protection, gloves, knee pads
Base depth: For patios in mild climates, plan 4–6 inches of compacted base. In freeze-thaw zones, go 8–10 inches. Your future self will thank you when nothing heaves.
Cost and Time: At a Glance
Expect $6–$18 per square foot depending on paver style and base depth. Renting a plate compactor runs $60–$100/day. A 12×16 patio usually takes one ambitious weekend with a helper or two slower weekends solo. IMO, don’t rush compaction—it matters more than anything.
Prep the Site: Mark, Dig, and Set Grade
Good prep turns a DIY job into a pro-looking patio. Don’t shortcut this part.
- Lay out the shape. Use stakes and string to outline the patio. Measure diagonals to square it up until both diagonals match.
- Account for layers. Total excavation depth = base + bedding sand (1″) + paver thickness. Example: 6″ base + 1″ sand + 2.5″ paver = 9.5 inches below the final surface.
- Dig. Remove sod and soil to your calculated depth. Extend the dig area 6–8 inches past the patio footprint for edge restraints.
- Set slope with string lines. Attach strings to stakes at finished height. Drop the far end to achieve your slope (e.g., 3 inches over 12 feet). These strings guide everything.
Soil and Climate Adjustments
Got clay soil? Use more base and a non-woven geotextile to prevent pumping. Sandy soil drains well but still needs fabric to keep the base from migrating.
Cold climates need deeper base and meticulous compaction. If frost heave haunts your area, go with 8–10 inches of base and keep water moving.
Build the Foundation: Fabric, Gravel, and Screed
Your patio only stays flat if the foundation stays strong. We build from the ground up—literally.
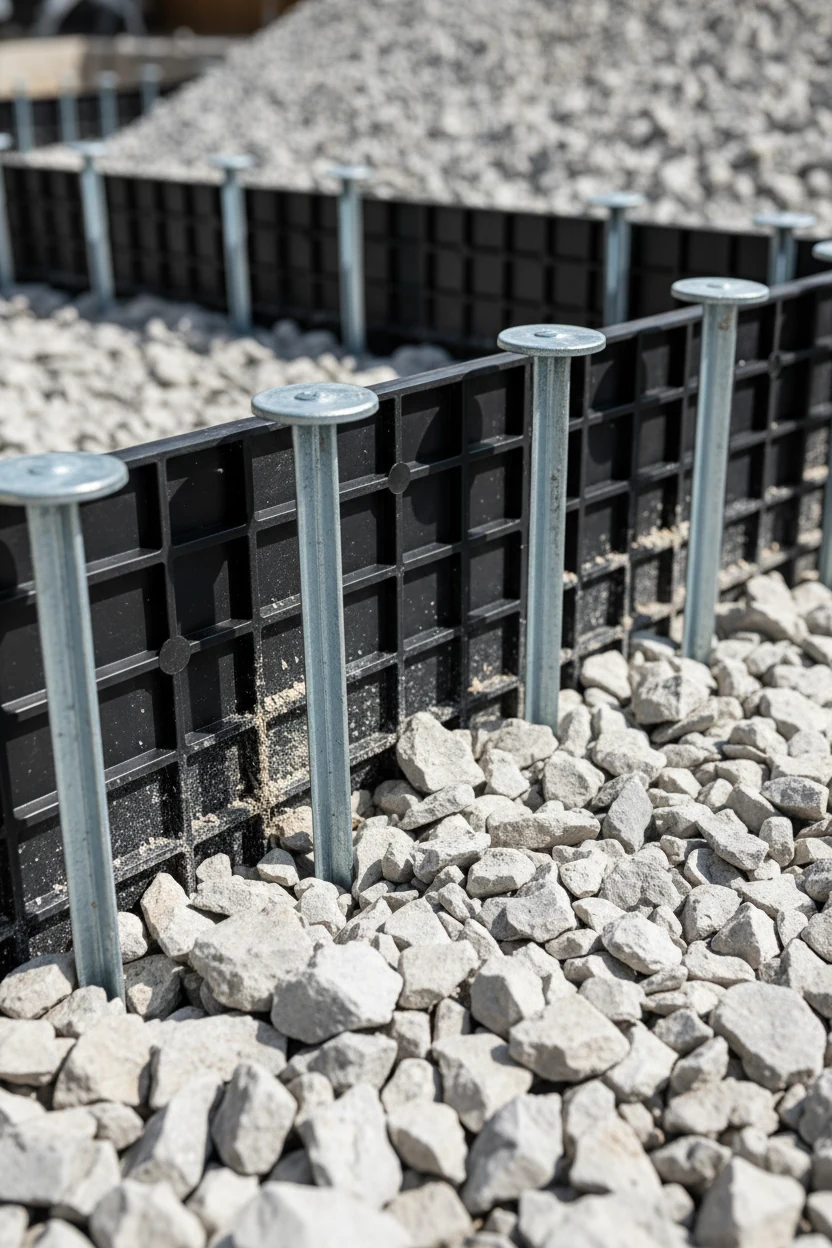
- Lay geotextile fabric. Overlap seams by 12–18 inches. Pin it in place so it doesn’t shift.
- Add base in lifts. Spread 2 inches of crushed stone and compact it. Repeat until you reach your target depth. Keep it just below your string lines to allow for 1″ of sand and paver thickness.
- Compact thoroughly. Run the plate compactor in overlapping passes. Moisten the base lightly if dusty; it compacts better.
- Check grade. Use a level on a long straight board or a laser to verify slope. Adjust high or low spots now.
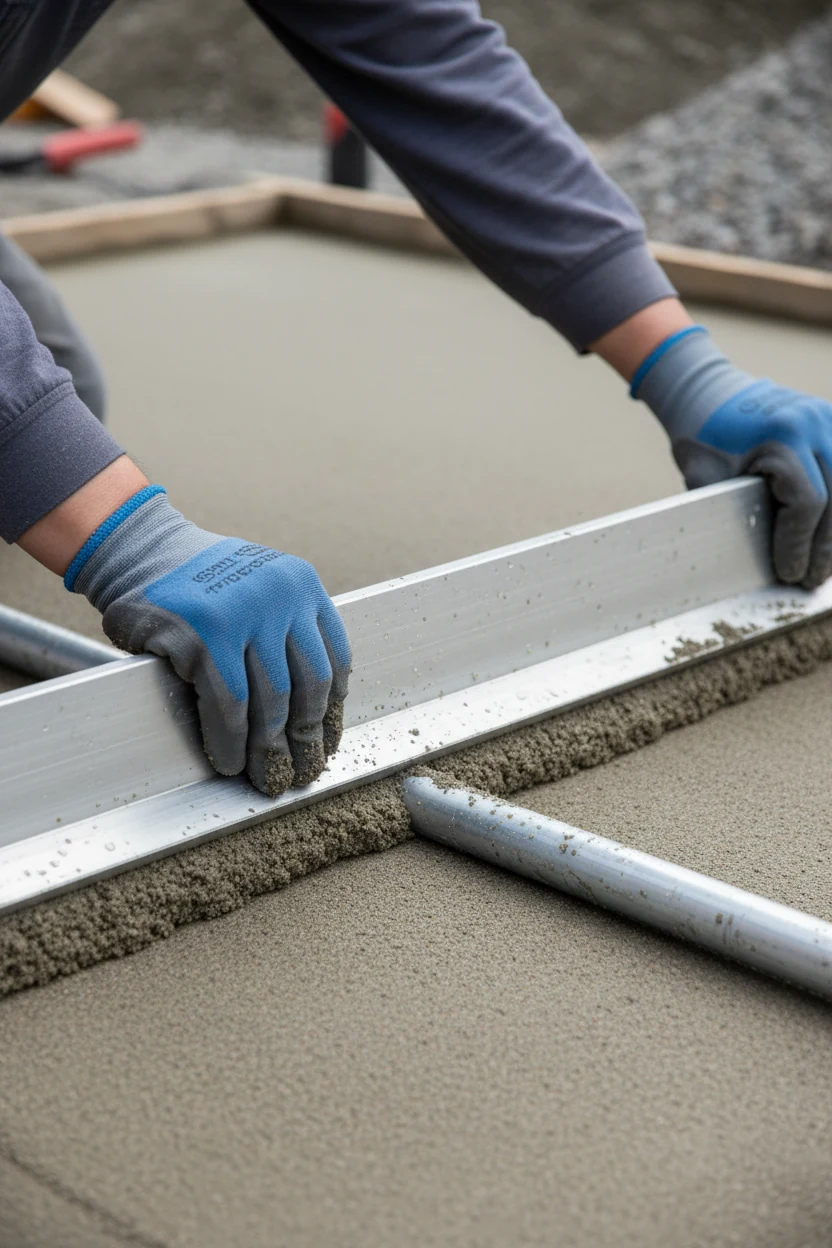
- Screed the bedding sand. Place two 1″ pipes on the compacted base. Pour concrete sand between them and screed with a straight board. Pull the pipes and fill the grooves gently—do not walk on the screeded surface.
Screed Rails Explained
Those 1″ pipes set a precise height for your sand layer. You slide a board over them to create a perfect, consistent 1-inch bed. If you skip this, you’ll chase level issues forever.
Compaction Tips
Compact each base lift separately. Your goal: a base that feels like asphalt when you step on it. If you leave footprints, compact again. FYI, most “wavy patio” posts online trace back to sloppy compaction.
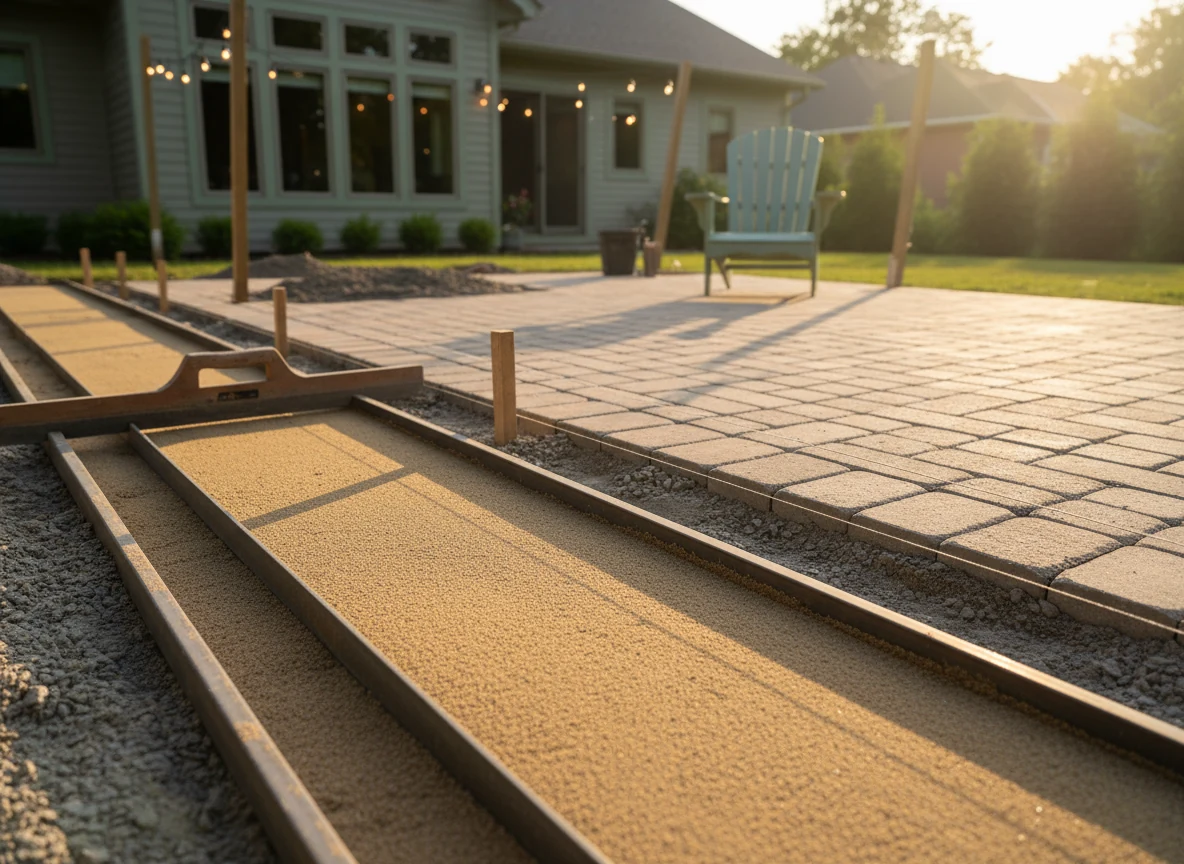
Lay the Pavers: Pattern, Spacing, and Cuts
This part feels like a giant, satisfying puzzle. You’ll see the patio appear one piece at a time.
- Start from a square, straight edge—usually along the house or a string line. Keep your first course perfect.
- Maintain consistent joints. Most pavers set with 1/8-inch gaps. Use spacers if your pavers don’t have built-in tabs.
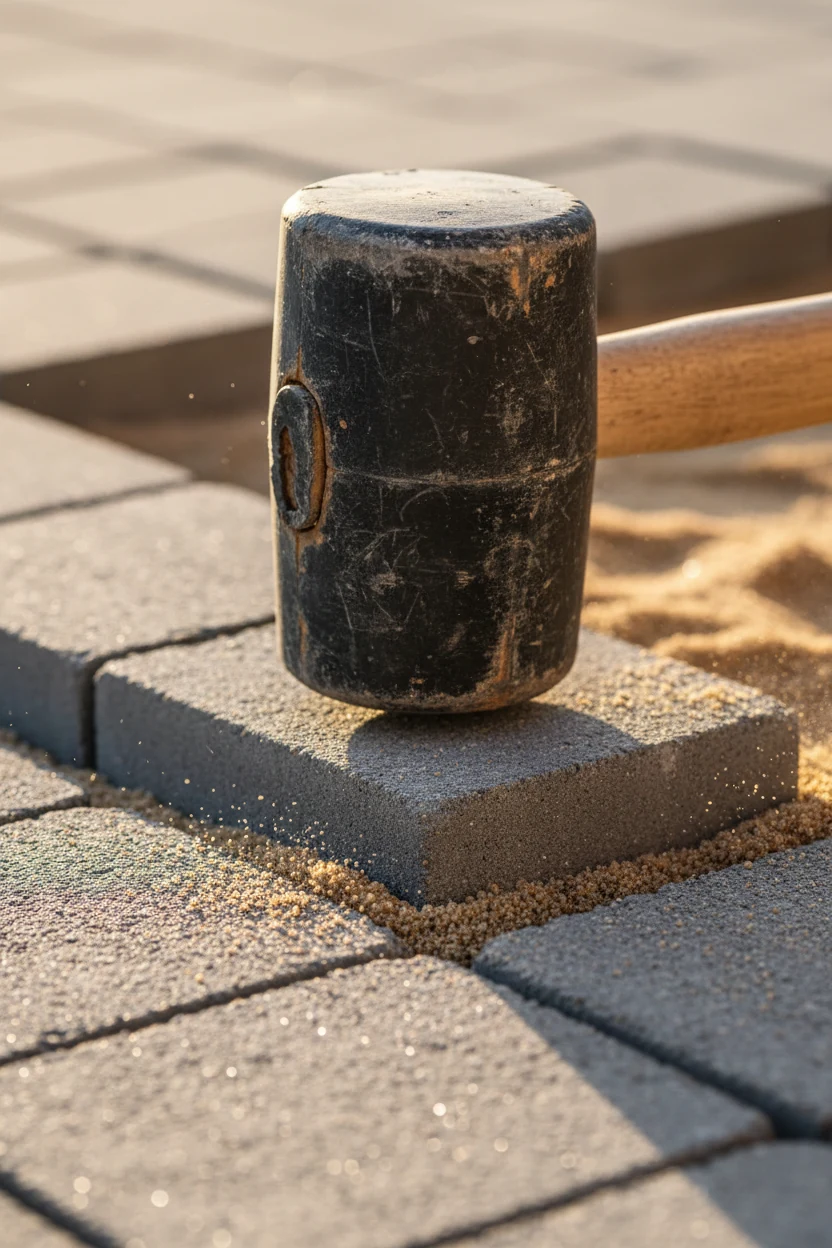
- Set each paver on the sand, then tap it with a rubber mallet to seat it. Keep the tops flush.
- Work outward, checking alignment every couple of rows. Snap additional string lines to keep everything straight.
- Measure and mark cuts for edges and curves. Leave the cutting until after you dry-lay the main field for speed.
Beginner-Friendly Patterns
Start with running bond (like brick), stack bond (grid), or 45-degree herringbone for extra interlock. Herringbone resists movement like a champ, and it looks expensive.
Large-format pavers can simplify layout, but they weigh more. Consider a border in a contrasting color or size for a polished look.
Cutting Safely 101
Use a wet saw for clean, accurate cuts with less dust. If you use an angle grinder, wear a respirator and cut outdoors. Mark both sides, score lightly, then finish the cut. Keep your fingers well away from the blade—obvious, but worth saying.
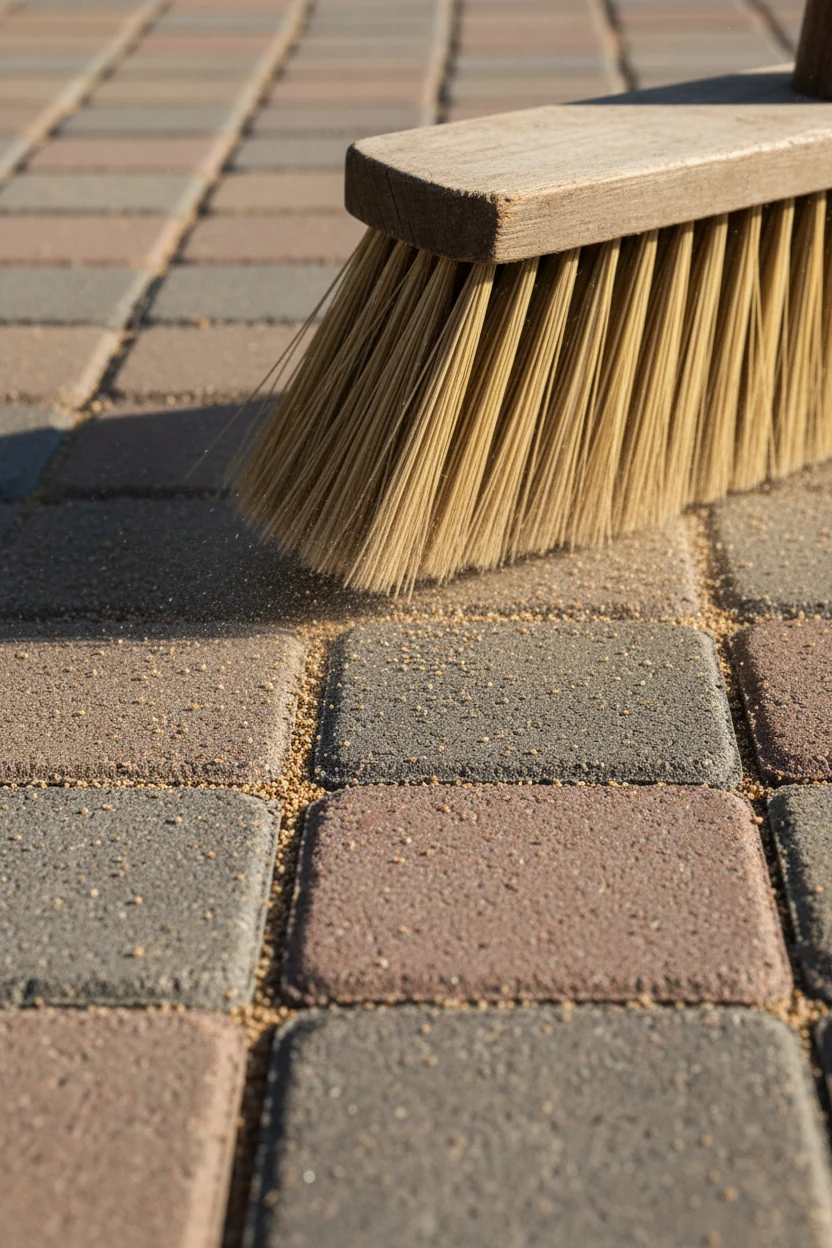
Lock It In: Edge Restraints and Joint Sand
Edges keep your patio from creeping and your pattern from spreading. Sand locks the joints and keeps weeds at bay.
- Install edging tight against the pavers. Spike it into the compacted base, not soil, every 8–12 inches and at joints.
- Compact the surface with a plate compactor fitted with a protective pad. Make overlapping passes to seat pavers into the sand.
- Sweep polymeric sand into joints until they’re full. Top up after a quick pass with the compactor settles the sand.
- Clean meticulously with a blower. Dust on the surface turns into a haze after watering, and you’ll hate it.
- Mist in stages. Lightly wet the surface, wait, and mist again per the bag’s directions. Don’t flood it. Let it cure 24–48 hours without foot traffic or rain.
Regular joint sand works, but polymeric sand hardens and resists weeds and ants better. IMO, polymeric is worth the few extra bucks for less maintenance.
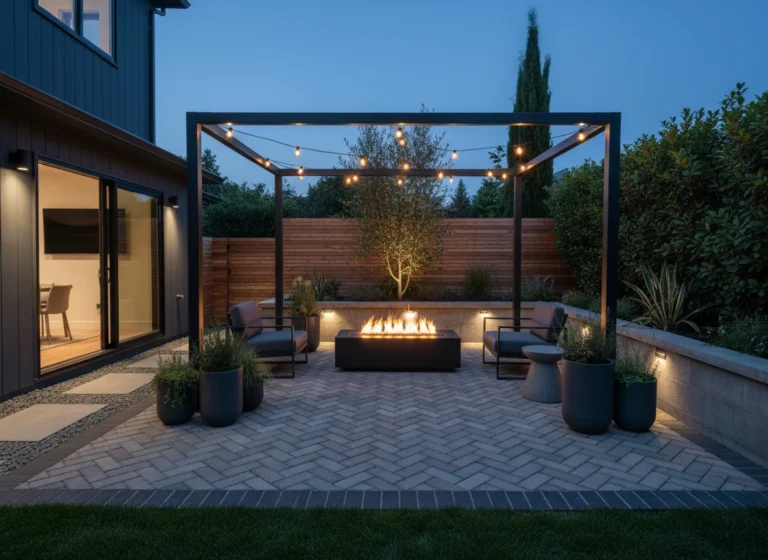
Finishing Touches: Style It Like a Pro
You built the stage—now add the vibe. A simple border of river rock softens edges and improves drainage. Add planters, a low-voltage lighting kit, and a couple of Adirondack chairs, and you’ve got instant backyard lounge.
Want a fire feature? Choose a portable, spark-screened fire pit unless your local code allows permanent builds. Add a grill station, side table, or a storage bench for tools and cushions. You’ll use the space more when it’s comfortable and ready to roll.
Maintenance and Common Mistakes to Avoid
Paver patios don’t demand much, but a little care keeps them sharp. Sweep debris, pull occasional weeds, and rinse off spills before they stain. If you want to seal it, pick a breathable, paver-specific sealer and test a small spot first.
Common mistakes to dodge:
- Skimping on base depth or compaction
- No slope or slope toward the house (hello, swamp)
- Using play sand instead of concrete sand for bedding
- Skipping geotextile on clay or soft soil
- Compacting the bedding sand before laying pavers (don’t)
- Installing edging into soil instead of the base
- Overwatering polymeric sand and causing haze
Quick Seasonal Care
In spring, blow off debris and check for joint sand loss. Top up polymeric sand if joints look low. In winter, use a plastic shovel and calcium chloride instead of rock salt to avoid surface damage. Spot-level any settled areas by lifting pavers, adding sand, and relaying—easy fix.
Step-by-Step Summary (Bookmark This)
Sometimes you just want the checklist. Here’s the whole build in one hit.
- Call 811, check permits/HOA, choose site and slope.
- Stake and string the layout; square it up.
- Calculate total excavation depth; dig 6–8″ beyond the footprint.
- Lay geotextile fabric; overlap seams 12–18″.
- Add base in 2″ lifts; compact each lift thoroughly.
- Verify slope with string and level; adjust as needed.
- Screed 1″ of concrete sand using pipes and a straight board.
- Lay pavers from a straight, square edge; keep joints consistent.
- Cut edges cleanly with a wet saw or grinder.
- Install edge restraints spiked into the base.
- Compact the surface with a padded plate compactor.
- Sweep in polymeric sand; compact and top up; clean off dust.
- Mist to activate polymeric sand; allow 24–48 hours to cure.
- Style it out with seating, lighting, and plants. Enjoy.
FAQ
How long does a DIY paver patio take?
A straightforward 10×12 patio usually takes one weekend with two people. Day one handles excavation and base, day two handles sand, laying, and finishing. Larger or curved designs add time, and so does rental timing for the compactor and saw. Build in buffer time for unexpected roots or rocks.
Can I lay pavers over existing concrete?
Yes, if the concrete sits solid and drains well. Clean it, add a 3/4-inch sand bed or a paver base panel, and use a low-profile edge restraint bonded to the slab. Maintain slope away from the house. If the slab cracks or wobbles, remove it and build a proper base instead.
What base material should I use?
Use angular crushed stone, often labeled 3/4″ minus, CA6, or crusher run. The fines in it lock together when you compact. Avoid pea gravel—it doesn’t lock and moves under load. For bedding, stick to concrete sand, not play sand.
Do I need to seal my pavers?
You don’t need to, but sealing can enhance color and resist stains. Choose a breathable, paver-safe sealer and follow cure times. Reapply every 2–3 years depending on wear and climate. IMO, seal high-traffic cooking areas and skip low-traffic zones if you like a natural look.
How do I fix a low spot that collects water?
Mark the area and lift those pavers with a couple of screwdrivers. Scrape or add bedding sand to correct height, screed smooth, and relay the pavers. Tap them in with a mallet and check with a straightedge. Sweep in sand again to finish.
What if weeds grow between the pavers?
Weeds usually sprout from seeds that land on top, not from below. Keep joints filled with polymeric sand and blow off debris regularly. For stubborn spots, spot-treat with a gentle herbicide or a vinegar solution. If ants move in, refill joints and use an ant-safe treatment.
Conclusion
You can absolutely build a paver patio that looks pro, costs less than hiring it out, and holds up for years. Plan the slope, overbuild the base, and take your time with compaction and edges—those steps make the difference. Add some comfy chairs and string lights, and boom: your backyard officially upgrades from “meh” to “where’s the invite?” FYI, once you finish one, you’ll start eyeing a walkway next.